K2 Google G Suite Integration [EN Version]

Credit of this blog goes to withsp

Hello today we’ll talk about integration between K2 and Google GSuite. Pre-requisite as below

  • K2 Five version 5.0001.1000.1 or above (version date is 28 Nov 2017)
  • Google account

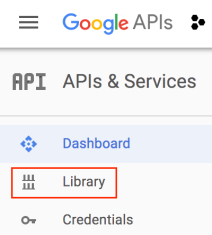
Firstly, we need to prepare google service that we want to intergrate with. Url for enable service is https://console.developers.google.com/apis. You need to signin with google account. Click Library tab on the left.

google01

In our example we’ll use Google Drive API.

google02

Click Enable button

google03

Then go to tab Credentials and select OAuth consent screen. Select your email and enter Product Name

google05

After Save click at Credentials again and select Create credentials => OAuth client ID

google06

In Create client ID screen select Application Type as Web application and input Name. Input Authorised JavaScript origins as your K2 site url and Authorised redirect URIs as K2 site url append with /identity/token/oauth/2

google07

After created, we’ll get Client ID and Client secret. These will use to register with K2. So we’ll finish setup Google side.

google08

Open your K2 management site and navigate to Authentication => OAuth => Resource Types. Create your new OAuth Resource Type

google10

Next step is create Resource Type Parameters at the bottom view

google11

After finish, navigate to OAuth => Resources. Create your new OAuth Resource and select Resource Type as your created resource from previous step. Input Authorization Endpoint as https://accounts.google.com/o/oauth2/auth and Token Endpoint as https://accounts.google.com/o/oauth2/token

google12

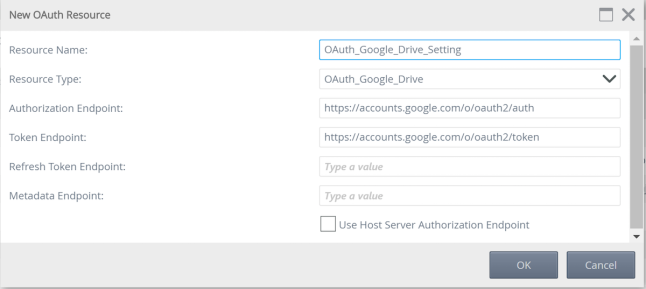
Next step is configure parameter for OAuth Resource

  • client_id and client_secret input information that we got from Google.
  • response_type input Authorization Value as code
  • scope input as https://www.googleapis.com/auth/drive
  • redirect_uri input Authorization Value and Token Value as K2 site url append with /identity/token/oauth/2
  • grant_type input Token Value as authorization_code
  • access_type input Authorization Value and Token Value as online

google13

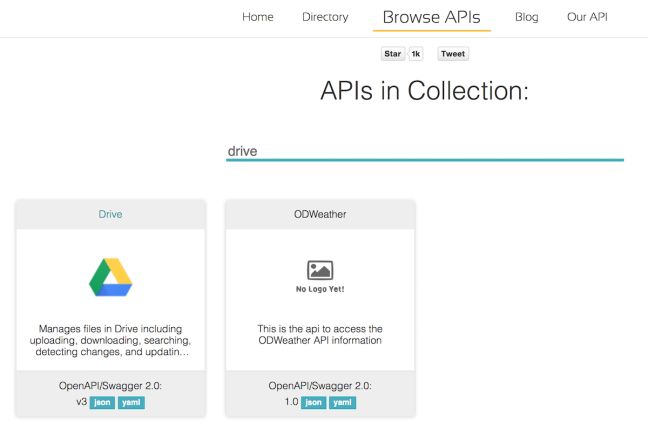
After finish we’ll have OAuth resource ready to use in service instance configuration. For configure REST service instance we need to have json of service that we want to use. For Google Drive we can search at  https://apis.guru/browse-apis/

google14

Next step we’ll register REST service. Select Authentication Type as OAuth and select our OAuth Resource from previous step

google15

google16

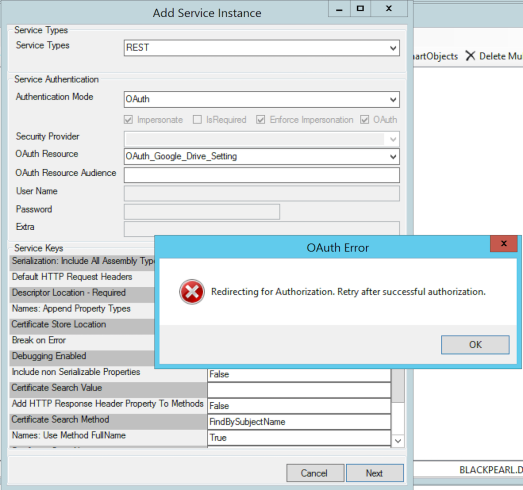
If we found above error, don’t be panic. After you finish OK, system will open browser for you to authentication with google. After you input username password and follow instruction on screen. You will navigate to Authorization Successful screen.

google17

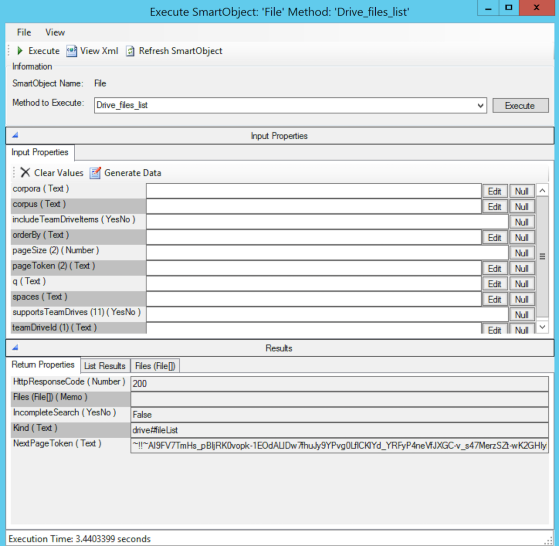
Try adding service instance again. You should be able to create new service instance. Then you can create SmartObject to get data from Google Drive as expected.

google18

Step for create OAuth in K2 reference from https://help.k2.com/kb001702. Google API document can found in google website that you for enable services. If you have question, please feel free to ask. See you next time 🙂


K2 Google G Suite Integration [TH Version]

บทความนี้ขอมอบ credit ให้ withsp

สวัสดีครับ วันนี้เราจะมาคุยกันเรื่อง integration ระหว่าง K2 กับอย่างอื่นที่ไม่ใช่ตระกูล Microsoft กันบ้าง นั่นคือ Google GSuite นั่นเอง เรามาดู pre-requitsite กันก่อน

  • K2 Five version 5.0001.1000.1 ขึ้นไป (version นี้ออกวันที่ 28 Nov 2017)
  • Google account

อย่างแรกเลย เราต้องมาเตรียมตัวในฝั่ง Google กันก่อน ให้เข้าไป enable service ที่เราต้องการผ่าน ให้ login เข้าไปด้วย google account ของเราเอง ที่ url https://console.developers.google.com/apis จากนั้นให้กด tab Library ทางด้านซ้าย

google01

ให้เลือก library ที่เราต้องการใช้ ในตัวอย่างนี้เราจะใช้ Google Drive กัน

google02

ให้กดปุ่ม Enable

google03

จากนั้นให้กดที่ tab Credential และเลือก OAuth consent screen ให้เลือก email แล้วก็ใส่ Product Name เป็นอะไรก็ได้

google05

เมื่อกดปุ่ม Save แล้วให้กดกลับไปที่ Credentials แล้วเลือก OAuth client ID

google06

ในหน้า Create client ID ให้เลือก Application Type เป็น Web application และตั้งชื่อ client เป็นอะไรก็ได จากนั้นใส่ Authorised JavaScript origins เป็น url ของเครื่อง K2 กับ Authorised redirect URIs ให้ใส่เป็น url เครื่อง K2 ต่อด้วย /identity/token/oauth/2

google07

เราจะได้ Client ID กับ Client secret มาเพื่อเอาไป register กับ K2 ต่อไป เป็นอันเสร็จสิ้นกระบวนการฝั่ง Google

google08

มาที่ฝั่ง K2 บ้าง ให้เข้าไปที่ site management กดไปที่ Authentication => OAuth => Resource Types ให้สร้าง Resource Type ใหม่ขึ้นมา

google10

เมื่อสร้างเสร็จให้สร้าง Resource Type Parameters ที่ tab ด้านล่าง

google11

จากนั้นให้ไปกดที่ OAuth => Resources ให้สร้าง OAuth Resource ใหม่ขึ้นมา โดยเลือก Resource Type ที่เราสร้างไว้แล้ว และใส่ Authorization Endpoint เป็น https://accounts.google.com/o/oauth2/auth และ Token Endpoint เป็น https://accounts.google.com/o/oauth2/token

google12

กดสร้าง OAuth Resource แล้วก็ไปกำหนดค่า parameter กัน

  • client_id กับ client_secret ให้ใส่ค่าที่ได้มาจาก Google โดย client_secret จะใส่แค่ Authorization Value กับ Token Value
  • response_type ใส่ Authorization Value เป็น code
  • scope ใส่เป็น https://www.googleapis.com/auth/drive
  • redirect_uri ใส่ Authorization Value กับ Token Value เป็น url ของ K2 ต่อด้วย /identity/token/oauth/2
  • grant_type ใส่ Token Value เป็น authorization_code
  • access_type ใส่ Authorization Value กับ Token Value เป็น online

google13

ถ้าทำเสร็จเรียบร้อย เราจะได้ OAuth ที่พร้อมสำหรับเอาไปใช้ register service instance แล้ว ในการจะ register REST service ให้ K2 เราจำเป็นจะต้องมี json ของ service ที่เราจะใช้งาน จะไปเขียน swagger เองก็ได้ แต่ด้วยความที่ Google API เป็นอะไรที่ค่อนข้างจะดัง เราเลยสามารถไปหามาจากที่อื่นได้ ผมไปหามาจาก https://apis.guru/browse-apis/ เราก็จะได้ json มาใช้แล้ว

google14

ขั้นต่อไปให้ไปที่ SmartObject Service Tester หรือใน Management site ก็ได้ แล้วกด Register REST Service เลือก Authentication Type เป็น OAuth และเลือก OAuth Resource เป็นอันที่เราสร้างไว้

google15

google16

ถ้าเจอ error นี้ไม่ต้องตกใจ เมื่อกด OK tester จะเปิด browser ให้เพื่อ authenticate กับ Google ให้ ใส่ username และ password จนถึงหน้า Authorization Successful

google17

ให้กด Add Service Instance อีกที จะสามารถสร้าง Service Instance ได้ จากนั้นก็จะสามารถสร้าง SmartObject เพื่อดึงข้อมูลจาก Google Drive ได้

google18

วิธีการสร้าง oAuth ใน K2 reference มาจาก https://help.k2.com/kb001702 ส่วน api ของ google ดู document ได้จากใน web API ของ Google เลย สำหรับคราวนี้ก็จบเพียงเท่านี้ เจอกันใหม่คราวหน้าครับ 🙂


[K2 Five] – Workflow REST & SMO OData

สวัสดีครับ วันนี้เราจะมาพูดถึง API ที่เราน่าจะได้ใช้กันบ่อยๆ คือ REST service ของ Workflow และ SmartObject

Workflow REST API

โดยสิ่งที่จะต้องทำเป็นอย่างแรกเลยคือ ไป enable service ใน Management site ก่อน

Workflow REST API Setting

หลังจากเปิดแล้วจะได้ตามด้านล่าง

Workflow REST API Setting Enable

เราสามารถทดสอบ API ได้จาก Swagger URL ด้วย

Workflow Swagger URL

Workflow Swagger Result

โดยตัวอย่างการใช้งานโดยเรียกจาก application อื่นๆ สามารถดูได้จาก https://help.k2.com/onlinehelp/k2five/DevRef/5.0/default.htm#Runtime/WF-REST/REST-Samples.htm

SmartObject OData API

เหมือนกับ Workflow REST API ต้องไปเปิดใน management site ก่อน (ถ้าเป็น version ก่อนๆ เราจะต้องไปเปิดใน config ตามวิธีใน  https://help.k2.com/onlinehelp/k2blackpearl/DevRef/4.7/default.htm#Configuration2.html)

SMO Service Setting

หลังจากเปิดแล้วจะเป็นตามด้านล่าง เราสามารถเลือก SmartObject ที่ต้องการ exposed เป็น REST service ได้ด้วย

SMO Server Setting Enable

ทีนี้พอเปิดแล้วเราก็มาลองกันซักหน่อย วิธีง่ายที่สุดคือ ใช้ Excel โดยเลือก Import Data From OData Data Feed

Excel OData

ใส่ link และ credential

Excel Data Connection Wizard

ใน wizard จะมี SmartObject ให้เลือก

List SMO

จากนั้นจะให้เลือก Import Data เป็นแบบไหน

Excel Import Data

จากนั้นก็จะได้ข้อมูลอย่างที่เราต้องการ 🙂

Excel

สำหรับรายละเอียด สามารถดูเพิ่มเติมได้จาก https://help.k2.com/onlinehelp/k2five/DevRef/5.0/default.htm#Runtime/SmO-REST/SmORESTServices.htm%3FTocPath%3DRuntime%2520APIs%2520and%2520Services%7CSmartObjects%7CSmartObject%2520REST%2520Services%7C_____0 ครับ

Consume REST Services with K2

สวัสดีครับ เนื่องจากใน K2 4.7 มี broker ใหม่เพิ่มเข้ามา และเป็น broker ที่เราน่าจะได้ใช้กันเยอะในอนาคต broker ตัวนี้ก็คือ REST service broker นั่นเอง

การเชื่อมต่อ REST service ใน K2 จะแตกต่างจากการเชื่อมต่อ web service อื่นๆ อยู่ตรงที่ เรารู้แค่ url ของ web service นั้นไม่พอ สิ่งที่ต้องมีถัดไปคือ descriptor file ใน format ของ JSON ถ้าเป็น REST service ที่เราเขียนเองก็อาจจะไม่ยาก เพราะเราสามารถ generate JSON ออกมาจาก swagger ที่เราเขียนได้ แต่ถ้าไม่ได้เขียนเองมี option ตามด้านล่าง

โดยในส่วนที่อยู่ใน blog นี้จะเป็นการเขียนเอง

ถ้าจะเขียน descriptor เอง เราควรรู้อะไรบ้าง?

  • Format ที่ REST Service response ออกมา
  • Swagger syntax ที่จะใช้เขียน เพื่อทำ mapping กับ service ที่เราจะใช้

ผมเลือก service จาก Accuweather (https://developer.accuweather.com) มาลองดู สามารถสมัครมาลองใช้ได้ฟรี แต่ service ก็จะ limit หน่อย (ถ้าใครอยากลอง ก็ไปสมัครแล้ว register app ก็จะได้ API Key ที่ต้องใช้ในมา) ใช้ได้ไม่กี่อัน แต่หลักๆ ของ service ที่มีให้คือ การพยากรณ์ต่างๆ

Weather API

ที่เราจะใช้กันคือ Location API เพื่อหาพื้นที่ที่ต้องการ กับ Forecast API เพื่อดูพยากรณ์ (จริงๆ อยากใช้ Weather Alerts มากกว่า แต่แบบฟรีใช้ไม่ได้ T-T)  อย่างที่บอก เริ่มแรกคือ ต้องไปลองเรียก REST Service เพื่อให้ return response มาซะก่อน

API Response

พอได้ response เราก็เอามาเขียน swagger เพื่อที่จะ generate เป็น descriptor กัน รายละเอียดเกี่ยวกับ swagger ลองอ่านดูตาม link ด้านล่างนะครับ

Tool ที่ผมใช้ในการเขียน swagger ก็มาจาก swagger.io นี่แหละ ใช้เป็นแบบ online เลยง่ายดี สามารถเข้าไปได้ที่ http://editor.swagger.io  ถ้าเขียนเสร็จแล้วก็น่าจะได้ format แบบด้านล่างนี่ล่ะ

Swagger UI

สิ่งที่ควรระวังตอนเขียน swagger คือ ในบางกรณีที่เรามีการเรียกใช้ reference object ซ้อนๆ กัน การประกาศบางแบบอาจจะเรียกใช้ไม่ได้ใน K2 นะครับ แบบที่ใช้ได้จะมีตัวอย่าง file swagger ที่เขียนให้ download ตอนท้ายบทความครับ

เมื่อเขียนเรียบร้อย เราสามารถ generate JSON file ได้โดยเลือกเมนู File -> Download JSON

Download JSON

พอได้ file มา เราก็เอามา register กับ K2 โดยผ่าน SmartObject Service Tester

02-Register REST

03-Register 2

หลังจาก register แล้ว เราก็จะเห็น object ที่สามารถเรียกได้ตามด้านล่าง

04-After Regist

จะเห็นว่า มี method พวก Serialize กับ Deserialize มาด้วย method พวกนี้จะเป็น method สำหรับดึงค่าจาก type ที่ return มาเป็น structure เหมือนกับที่เราใช้ K2 ต่อกับ SAP หรือ web service อื่นๆ จากนั้นลองสร้างเป็น smartobject แล้วทดสอบดู

05-Test City Search

อย่างแรกเลยคือ call City Search เพื่อหาเมือง เพิ่งรู้นะเนี่ยว่า กรุงเทพฯ มีที่อินโดนีเซียด้วย พอได้แล้ว ผมก็เอา Key ไปใช้เพื่อหา forecast ของ 5 วันข้างหน้า

06-5 day forecast

ใน method นี้จะ return Headline หรือคือ พาดหัวข่าวสำคัญ เช่น ฝนจะตกหนักวันไหน กับรายละเอียด forecast มาเป็น object ส่วนที่เราต้องทำถัดไปคือ เอา xml ยาวๆ ที่ได้ ไป call method Deserialize เพื่อให้แสดงผลออกมาเป็น property ออกมา

ส่วนของ Headline ผมได้ xml ตามด้านล่างออกมา

{“$type”:”Accuweather.k2RESTidentifier_Headline, Accuweather, Version=0.0.0.0, Culture=neutral, PublicKeyToken=null”,”EffectiveDate”:”2017-08-13T01:00:00+07:00″,”Text”:”A thunderstorm late Saturday night”,”Category”:”thunderstorm”,”Link”:”http://www.accuweather.com/en/th/bangkok/318849/daily-weather-forecast/318849?lang=en-us”}

ผลหลังจากการ call โอ๊ะ!!! ฝนตกหนักคืนวันเสาร์ตอนดึกๆ

07-Headline Call

ส่วนของพยากรณ์จะได้เป็น array ออกมา

{“$type”:”Accuweather.k2RESTidentifier_DailyForecast[], Accuweather, Version=0.0.0.0, Culture=neutral, PublicKeyToken=null”,”$values”:[{“$type”:”Accuweather.k2RESTidentifier_DailyForecast, Accuweather, Version=0.0.0.0, Culture=neutral, PublicKeyToken=null”,”Date”:”2017-08-10T07:00:00+07:00″,”Link”:”http://www.accuweather.com/en/th/bangkok/318849/daily-weather-forecast/318849?day=1&lang=en-us”},{“$type”:”Accuweather.k2RESTidentifier_DailyForecast, Accuweather, Version=0.0.0.0, Culture=neutral, PublicKeyToken=null”,”Date”:”2017-08-11T07:00:00+07:00″,”Link”:”http://www.accuweather.com/en/th/bangkok/318849/daily-weather-forecast/318849?day=2&lang=en-us”},{“$type”:”Accuweather.k2RESTidentifier_DailyForecast, Accuweather, Version=0.0.0.0, Culture=neutral, PublicKeyToken=null”,”Date”:”2017-08-12T07:00:00+07:00″,”Link”:”http://www.accuweather.com/en/th/bangkok/318849/daily-weather-forecast/318849?day=3&lang=en-us”},{“$type”:”Accuweather.k2RESTidentifier_DailyForecast, Accuweather, Version=0.0.0.0, Culture=neutral, PublicKeyToken=null”,”Date”:”2017-08-13T07:00:00+07:00″,”Link”:”http://www.accuweather.com/en/th/bangkok/318849/daily-weather-forecast/318849?day=4&lang=en-us”},{“$type”:”Accuweather.k2RESTidentifier_DailyForecast, Accuweather, Version=0.0.0.0, Culture=neutral, PublicKeyToken=null”,”Date”:”2017-08-14T07:00:00+07:00″,”Link”:”http://www.accuweather.com/en/th/bangkok/318849/daily-weather-forecast/318849?day=5&lang=en-us”}]}

ผลหลังจากการ call ก็เป็นตามด้านล่าง

08-DailyForecast Call

จริงๆ ค่าที่ REST return มามีมากกว่าที่ผมเอามาแสดง แต่ผมเขียน swagger เพื่อเอาค่ามาเฉพาะที่ต้องการเท่านั้น (ขี้เกียจนั่นเอง = =’) ถ้าใครอยากดูตัวอย่างการเขียน swagger กับ file JSON ที่ generate ออกมาได้สามารถ download ได้ตาม link ด้านล่างนะครับ

สำหรับคราวนี้ก็ขอลาแต่เพียงเท่านี้ พบกันใหม่คราวหน้าครับ 🙂